Pen and ink drawing is an age-old art form that requires precision, patience, and practice to master. Many artists struggle with creating smooth lines, varying textures, and achieving consistent tone in their work. You may be one of them, or perhaps you’re eager to expand your skills and explore the possibilities of this unique medium. Whatever your level of experience, understanding the essential tools and techniques for pen and ink drawing is crucial to producing high-quality artwork.
A well-stocked toolbox is just the beginning – knowing how to use each tool effectively is where the real mastery begins. This article will cover the fundamental strokes, from basic lines to expressive flourishes, as well as advanced techniques for creating intricate textures and mixed media combinations. By the end of this guide, you’ll be equipped with a comprehensive understanding of pen and ink drawing techniques, allowing you to confidently experiment and push your creative boundaries.
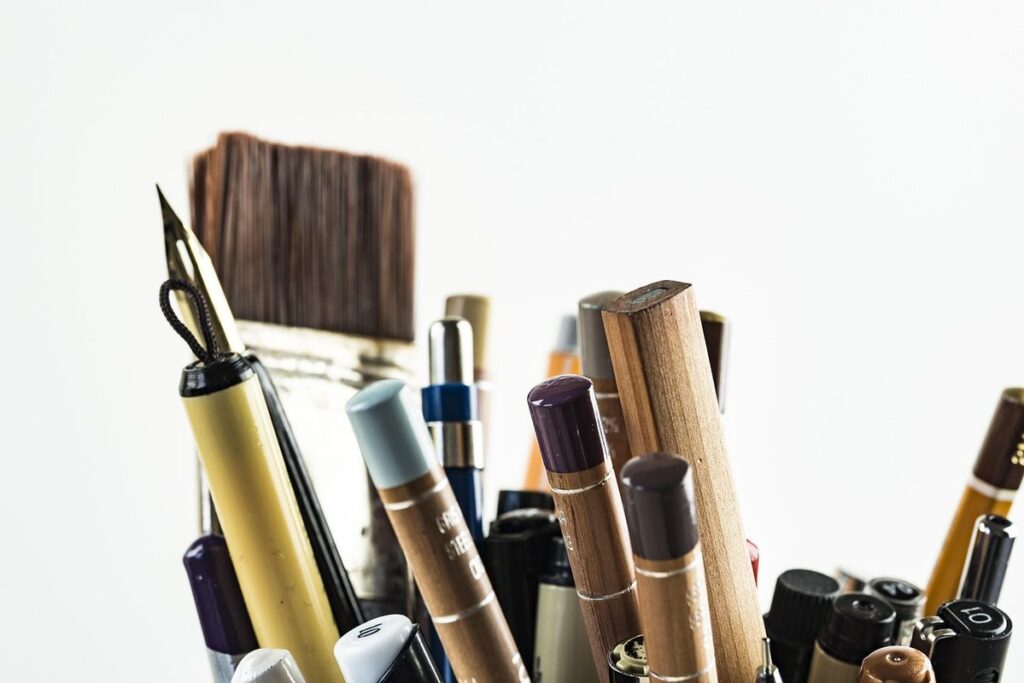
Understanding Basic Tools and Materials
As you begin to master pen and ink drawing techniques, it’s essential to understand the fundamental tools and materials that will help you achieve professional results. Familiarizing yourself with basic supplies will set a solid foundation for your artistic endeavors.
Choosing the Right Pens
When it comes to pen and ink drawing, the right tool can make all the difference. There are several types of pens available, each with its own unique characteristics and advantages.
Dip pens are a classic choice for pen and ink drawing. They consist of a metal nib attached to a wooden or plastic handle, which is dipped into an inkwell to create lines. Dip pens offer a wide range of line widths, from fine details to broad strokes, depending on the size and style of the nib.
Fountain pens are another popular option for pen and ink drawing. They use a refillable ink cartridge and have interchangeable nibs, allowing artists to experiment with different line widths and styles. Fountain pens are known for their smooth writing experience and durability.
Brush pens combine the look of traditional brushes with the convenience of pens. They have synthetic or natural fibers that mimic the strokes of a brush, creating a range of line widths and textures. Brush pens are ideal for artists who want to create expressive lines and subtle nuances in their drawings.
When choosing a pen, consider the nib size and style. A finer nib is best suited for detailed work, while a broader nib is better for loose, gestural strokes.
Inking Options: Dried Ink, Pigment-Based, and More
Dried ink is a traditional choice for pen and ink drawing, offering a range of line weights and expressive qualities. Its unique characteristic is the way it flows from the nib, creating varying widths and textures. Artists often use dried ink to achieve bold lines, hatching patterns, or delicate details.
Pigment-based inks are another popular option, known for their vibrant colors and lightfastness. These inks typically contain a mixture of pigments suspended in a solvent, which allows them to retain their color over time. Pigment-based inks work well with fine lines and detailed work, but may not be suitable for bold or expressive strokes.
Iron gall ink is a type of liquid ink made from iron salts and tannins. It’s prized for its rich, dark colors and ability to produce subtle tonal shifts. Iron gall ink can be more unpredictable than other inks, as it’s prone to bleeding and feathering on certain papers.
When choosing an ink, consider the specific needs of your project. If you’re working with fine details or intricate patterns, pigment-based inks may be a better choice. For bold lines and expressive strokes, dried ink is often preferred. Iron gall ink can add unique depth and character to your work, but requires careful handling to avoid unwanted effects.
Basic Techniques for Creating Expressive Lines
Mastering pen and ink drawing techniques is all about learning to create expressive lines, which can elevate your artwork from simple doodles to powerful statements. Let’s explore some fundamental techniques for getting started.
Hatching and Cross-Hatching Fundamentals
Hatching involves layering parallel lines to create a gradual transition between values. The direction of these lines can greatly impact the overall effect: for example, lines running horizontally across a subject can create a sense of flatness, while those running vertically or at an angle can suggest depth and movement. When hatching, it’s essential to maintain consistent line weight and spacing to achieve a cohesive look.
Cross-hatching is achieved by layering hatching lines at different angles. This technique allows for greater texture and visual interest than simple hatching, as the intersecting lines create a range of values and moods. To cross-hatch effectively, vary your line direction and angle, but maintain consistent spacing to avoid creating an overly busy or confusing image.
In various art styles, hatching and cross-hatching are used in distinct ways to convey emotion and atmosphere. For instance, graphic novels often employ dense, detailed cross-hatching to create a sense of realism and grittiness, while watercolor-inspired illustrations might use soft, layered hatching to evoke a dreamy or ethereal quality.
Stippling: The Art of Creating Patterns with Dots
Stippling involves creating detailed images or textures by carefully placing small dots. This technique requires patience and precision, as each dot contributes to the overall pattern. To master stippling, start with simple subjects like still-life compositions or abstract patterns. Practice building up layers of dots to achieve desired levels of detail and texture.
When experimenting with different themes, consider using stippling to create expressive portraits or landscapes. For example, you can use a limited color palette to convey mood and atmosphere in a landscape piece. To build up dark values quickly, use smaller dots for deeper tones and larger dots for lighter areas.
To increase speed and accuracy, try using a range of dot sizes and spacing them evenly apart. Experiment with different nibs or pens to achieve varying line widths and textures. Remember that stippling is not just about creating a precise image – it’s also about conveying emotion and atmosphere through pattern and texture.
Advanced Techniques for Achieving Realism and Texture
To take your pen and ink drawings to the next level, you’ll need to master advanced techniques that bring depth, texture, and realism to your work. This involves mastering subtle variations in line weight, value, and pattern.
Wet-on-Wet vs. Drybrush Techniques
When working on a pen and ink drawing, achieving smooth textures and subtle blending effects can be challenging. Two techniques commonly used to achieve these effects are wet-on-wet and drybrush. Wet-on-wet involves applying layers of ink to wet paper, allowing the ink to spread and blend with the previous layer. This technique is ideal for creating soft, gradient-like transitions between colors.
In contrast, drybrush involves dragging a almost-dry pen across the paper to create textured lines and subtle blending effects. To achieve smooth textures using this technique, it’s essential to maintain even pressure on the pen nib. Applying too much pressure can result in harsh, scratchy lines.
A common mistake when experimenting with these techniques is applying too much ink or using a brush that’s too wet. This can lead to muddy, indistinct textures and blending effects. To avoid this, use a small amount of ink and test the flow on scrap paper before applying it to your drawing. For added control, try using a pen with a flexible nib that allows for varying line widths.
When combining wet-on-wet and drybrush techniques, you can create complex, realistic textures by layering different strokes and allowing them to blend together. Experimenting with these techniques will allow you to achieve the kind of nuanced, realistic effects often found in high-quality drawings.
Blending and Smudging: Creating Soft Edges and Transitions
To create soft edges and transitions in pen and ink drawings, you can employ various methods. Using a tortillon is one approach – these small, oval-shaped tools are specifically designed to smudge graphite or ink without spreading it excessively. By gently rubbing the tortillon across the lines or areas where blending is desired, you can achieve subtle transitions between values.
Blending stumps, on the other hand, offer more control over the blending process. These small, tightly rolled pieces of paper allow for precise application of pressure and direction, enabling finer gradations in value. To blend effectively with a stump, apply gentle pressure to the area where smudging is desired, gradually increasing or decreasing pressure as needed.
Effective line weight and value control are crucial when creating realistic results. By employing techniques like these, you can transition between contrasting values more naturally, making your drawings appear more nuanced and detailed. This attention to blending also allows for better integration of lines and shapes within the drawing.
Experimenting with Mixed Media and Collage
As you experiment with new techniques, don’t be afraid to combine traditional pen and ink methods with mixed media elements, like paper scraps or paint. This can add exciting textures and depth to your artwork.
Combining Pen and Ink with Watercolors or Gouache
When combining pen and ink with watercolors or gouache, you can create artworks that are rich in texture and visual interest. Watercolors can be used to add subtle washes of color behind intricate pen and ink drawings, while gouache provides a more opaque and vibrant contrast.
To combine these media effectively, start by allowing your pen and ink drawing to dry completely before adding watercolor or gouache over it. This will prevent any bleeding or feathering between the different layers. You can also use masking fluid or frisket to protect areas of the drawing from unwanted color bleed.
Some artists prefer to create loose sketches with pen and ink, then layer transparent washes over them. Others build up detailed drawings using fine lines and subtle shading before adding opaque gouache highlights. Experimenting with different combinations of media can help you discover new techniques that suit your style.
Remember to balance the visual weight of each medium – for example, bold gouache accents can overpower delicate pen work if not balanced carefully. By combining these media thoughtfully, you can achieve unique textures and visual effects that elevate your drawings beyond traditional pen and ink alone.
Incorporating Paper Texture and Other Materials
Incorporating different paper textures and materials can add a new dimension to your pen and ink artwork. Experimenting with various techniques allows you to push the boundaries of traditional media and create unique, visually striking pieces.
To incorporate paper texture effectively, try layering multiple papers or using textured paper as the base. For example, placing a sheet of rough, watercolor paper under a smooth, vellum surface can create interesting contrast and visual interest. You can also use torn or crumpled paper to add a tactile quality to your artwork.
Other materials you can experiment with include tracing paper, transparent film, or even fabric scraps. These unconventional surfaces can be used to create subtle, layered effects when combined with pen and ink. To achieve this, try layering the material under a sheet of glass or using a fixative to secure it in place. This will allow you to build up layers without distorting the underlying paper. By combining traditional media with non-traditional materials, you can unlock new creative possibilities and expand your artistic expression.
Tips for Overcoming Common Challenges
Mastering pen and ink drawing techniques requires patience and persistence, but even experienced artists face common challenges. Let’s tackle some of these obstacles together.
Managing Ink Bleed and Feathering
When working with pen and ink, managing ink bleed and feathering is crucial for achieving crisp lines and vibrant details. Ink bleed occurs when the ink seeps into the paper’s fibers, creating a blurry or fuzzy effect, while feathering refers to the spreading of ink around line edges.
To minimize these issues, start by using high-quality paper designed specifically for pen and ink work. Look for papers with a smooth finish and a weight that can handle the ink without bleeding through. Some popular options include hot press watercolor paper and Bristol board. When choosing your paper, consider the intended use of your artwork – if you’re working on a detailed piece, a heavier weight paper will help prevent bleed.
The right nib size and style also play a significant role in preventing ink bleed and feathering. A smaller nib with a more rounded tip tends to produce thinner lines that are less prone to bleeding through the paper. Conversely, larger nibs with sharper tips can create thicker lines that may cause more bleed. Experiment with different nib sizes and styles to find what works best for your specific project and drawing style.
Solving Common Drawing Issues: Fixing Mistakes and Improving Skills
When working with pen and ink, it’s common to encounter issues like uneven line widths or a lack of detail. One frequent problem is inconsistent pressure on the pen, causing lines to vary in thickness. To address this, practice varying pressure by drawing a series of lines with different weights, gradually increasing and decreasing force as you go.
To improve your ability to control line width, try using a range of pens with distinct nib sizes or tine spacings. This will help you develop a sense of the relationship between pen and paper, allowing for more precise control over line widths. Additionally, paying attention to the angle at which you hold the pen can also make a significant difference.
When mistakes do occur – whether it’s a stray ink smudge or an accidental erasure – don’t be too hard on yourself. Instead, try to view them as opportunities to practice fixing errors or experimenting with new techniques. For example, if you accidentally create a small ink blotch, see how you can incorporate it into the composition by using it as a design element.
To minimize mistakes in the first place, work on building your observational skills through regular practice and study of other artists’ work. Pay attention to the way different artists use line, value, and texture to convey mood and atmosphere.
Frequently Asked Questions
Can I Achieve Realism with Brush Pens?
Yes, brush pens can be used to achieve realistic drawings, especially when paired with the right ink and paper. The key is to experiment with different line widths and styles, as well as layering techniques to build up texture and depth.
How Do I Fix a Drawing That’s Been Affected by Ink Bleed or Feathering?
Fixing a drawing affected by ink bleed or feathering requires patience and the right materials. Start by assessing the extent of the damage and determining whether it’s possible to salvage the piece. If not, consider starting over with a new sheet of paper or using correction fluid to cover up mistakes.
Can I Use Pen and Ink Techniques for Illustrations That Require Color?
While traditional pen and ink techniques work best in black and white, some artists have successfully adapted these methods to create color illustrations by layering colored pencils or markers over the original drawing. However, this approach requires a great deal of practice and experimentation to achieve professional-looking results.
How Do I Know When to Use Wet-on-Wet vs. Drybrush Techniques?
The choice between wet-on-wet and drybrush techniques depends on your desired outcome. If you’re aiming for smooth textures or subtle blending effects, wet-on-wet is likely the better option. However, if you want to achieve bold, expressive strokes with a rough texture, drybrush might be more suitable.
Can I Use Pen and Ink Techniques in Combination with Digital Tools?
Yes, many artists successfully combine traditional pen and ink techniques with digital tools like scanners or drawing tablets. By scanning your original drawings and editing them digitally, you can enhance the colors, add textures, or even create new layers to achieve a unique mixed-media effect.