
Shading is often overlooked as an essential aspect of art, yet it can make or break a piece. Without proper shading, even the most detailed drawings can look flat and lifeless. Mastering depth, volume, and dimension in your artwork requires a solid understanding of basic techniques and advanced styles. You might be wondering how to create realistic shadows and reflections, or how to convey texture and atmosphere through subtle shading nuances. The truth is, learning to shade effectively takes practice and patience, but with the right guidance, you can take your art from two-dimensional to fully immersive. In this article, we’ll break down the fundamentals of shading, covering techniques for creating depth, volume, and dimension in your artwork, so that by the end of it, you’ll be able to master a range of shading styles and bring your creations to life.
Understanding the Basics of Shading
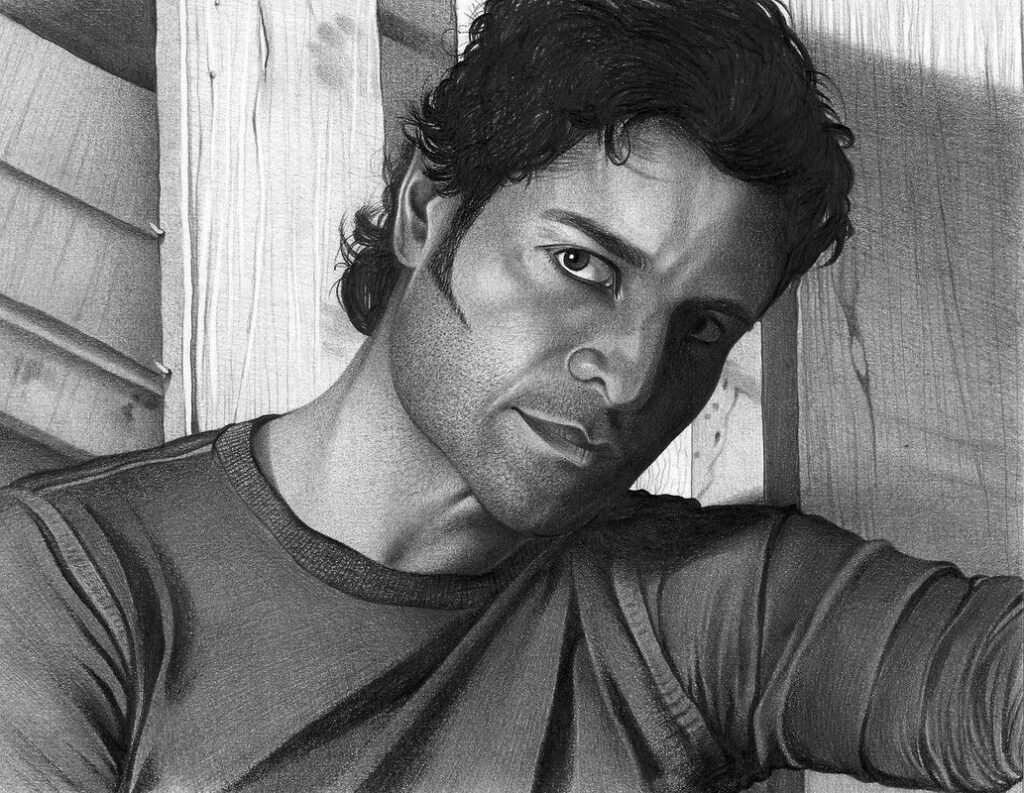
Shading can seem overwhelming at first, but it all starts with a solid understanding of basic techniques that bring depth and dimension to your artwork. Let’s break down the fundamental principles that every artist should know about shading.
What is Shading?
Shading is a fundamental art technique used to create depth, volume, and dimension in artwork. It involves using various tools and methods to apply different shades of value to create a three-dimensional effect.
When you add shading to an image or sculpture, you’re essentially creating the illusion of light and shadow on a two-dimensional surface. This can be achieved through various techniques, including hatching, cross-hatching, stippling, and scumbling. Each method has its unique characteristics and applications, but they all share the common goal of producing a range of values that guide the viewer’s eye.
To create convincing shading, it’s essential to understand how light interacts with form. Pay attention to the way light falls on curved surfaces versus flat ones, as well as the shadows cast by objects in different environments. Practice applying different shading techniques to achieve varying levels of realism and style. For example, soft brushstrokes can produce subtle texture and dimension, while bold hatching can create dramatic contrasts.
Types of Shading: Flat, Gradient, and Textured
Flat shading is often used in 2D art forms such as comics, cartoons, and illustrations where it helps to create a sense of volume without added complexity. It involves assigning a uniform color value to each polygon or surface area in the drawing. This technique can be particularly useful when working with simple shapes or designs.
Gradient shading, on the other hand, is commonly used in digital art, video games, and 3D modeling. It simulates smooth transitions between colors by layering multiple shades of an object’s material properties. For instance, a sunset might display warm orange hues gradating into cool blue tones, creating depth and atmosphere.
Textured shading involves adding surface details to give objects a more realistic appearance. This technique is often used in film, animation, and fine art to create intricate effects such as skin texture, fabric folds, or stone patterns. By applying textured shading, artists can convey the tactile nature of an object’s surface, making it easier for viewers to imagine its physical presence.
Fundamentals of Shading Tools and Materials
Let’s start with the basics: shading tools can greatly enhance your artwork, so it’s essential to understand how to choose and use them effectively. We’ll explore the fundamentals of brushes, pencils, and other materials.
Choosing the Right Shading Tool
When working with shading tools, it’s essential to choose the right one for the job. Pencils are ideal for delicate, detailed work and can be used for both line art and shading. They’re also great for sketching and blocking out large areas of value. Graphite pencils (HB, 2B, 4B, etc.) offer a range of values, from light to dark.
Markers, on the other hand, are perfect for creating bold lines and vibrant colors. They come in various tip sizes and can be used to create smooth transitions between values. However, they can also bleed or feather on certain papers, so it’s crucial to test them before using them extensively.
Brushes, whether physical or digital, offer a range of effects, from subtle texture to expressive strokes. Digital drawing software allows for immense flexibility and control over colors and blending modes, making it ideal for complex shading work. Consider the specific effect you want to achieve and choose your tool accordingly. Experiment with different tools to find what works best for your personal style and preferences.
Understanding Paper Quality and Texture
When working with shading tools and materials, it’s essential to consider the properties of paper and its impact on the final result. The quality and texture of the paper can significantly affect the performance of various shading techniques. A rough or textured paper, for instance, may be ideal for hatching or cross-hatching methods, as it allows for a range of line weights and tonal values.
On the other hand, smooth papers are better suited for stippling or fine detailed work. These textures can prevent unwanted scratches or lines that might compromise the image’s integrity. Furthermore, paper with a high rag content tends to produce more stable results over time, as it is less prone to yellowing or degradation.
In practice, artists often experiment with different types of paper and techniques to find what works best for their specific needs. By being aware of these factors, you can choose the right tools and materials for your project, ensuring that your shading techniques are executed effectively and efficiently.
Basic Shading Techniques for Beginners
To start creating stunning artworks, you need a solid foundation in basic shading techniques. Let’s begin with the fundamentals of shading, focusing on simple yet effective methods.
Introduction to Hatching and Cross-Hatching
Hatching and cross-hatching are fundamental techniques used to create depth, dimension, and value structure in artwork. Hatching involves creating parallel lines of varying density to suggest form and texture, while cross-hatching involves layering hatching strokes at different angles to achieve increased detail and shading nuance.
When using these techniques, it’s essential to pay attention to the spacing between lines and the overall direction of your strokes. A general rule of thumb is to vary line spacing based on the level of detail needed for each area – closer spacings create more detailed textures, while wider spacings yield softer transitions. Experiment with different angles to achieve a range of tonal values and surface types.
To create smooth transitions between values, focus on gradual changes in line density rather than abrupt shifts. This can be achieved by varying the weight or darkness of your lines, using lighter hatching strokes for subtle shading or darker ones for deeper shadows. Practice combining hatching and cross-hatching to achieve rich textures and convincing forms in your artwork.
Stippling: Creating Texture and Pattern with Shading
Stippling is a fascinating shading technique that creates images using small dots. By carefully placing these dots, artists can achieve remarkable texture and pattern effects. This technique originated from newspaper illustrations, where artists would use tiny dots to create detailed images without the need for expensive equipment.
The beauty of stippling lies in its versatility – it can be used to create both subtle and dramatic effects. For example, a soft portrait can be achieved by using smaller dots with varying shades of gray, while a bold still life might require larger dots with more contrast between light and dark areas. To master stippling, practice is key: start with simple subjects like fruit or household objects and gradually move on to more complex compositions.
When creating stippling artwork, it’s essential to consider the dot size and spacing. Typically, the smaller the dot, the more detailed the image will be. However, too many small dots can lead to a ‘speckled’ effect – balance is crucial. Experiment with different dot sizes and patterns to achieve the desired texture and pattern in your artwork.
Advanced Shading Techniques and Styles
Now that you’ve mastered the basics of shading, it’s time to take your skills to the next level by exploring advanced techniques and styles that add depth and emotion to your artwork.
Atmospheric Perspective and Depth Perception
When applied correctly, shading can significantly enhance the sense of depth and distance in a piece. This is achieved through atmospheric perspective, where objects fade into the background as they recede from the viewer. One way to create this effect is by using soft, feathery brushstrokes for distant foliage or buildings, gradually increasing detail as objects come closer.
The use of aerial perspective also plays a crucial role in creating depth perception. Cool colors like blue and green tend to dominate in the distance, giving the impression of misty or hazy conditions. Conversely, warm colors like orange and red are often used for foreground elements, drawing attention to their proximity. By manipulating color temperature in this manner, you can effectively guide the viewer’s eye through your artwork.
In practical terms, consider the example of a landscape painting where the horizon line divides the scene into near and far areas. Use gentle, sweeping strokes to suggest distant mountains or trees, while increasing texture and detail for closer elements like rocks or foliage. This nuanced approach to shading will help create an immersive atmosphere that draws the viewer in.
Expressive Shading: Experimenting with Non-Traditional Materials
Expressive shading is a style that pushes the boundaries of traditional techniques by incorporating unconventional materials and methods. This approach allows artists to create dynamic, emotive pieces that explore texture, form, and atmosphere in new ways. To get started with expressive shading, experiment with combining different mediums such as charcoal, pastels, and ink to achieve varied tonal ranges and expressive brushstrokes.
One key aspect of expressive shading is its versatility – it can be applied to a wide range of artistic styles, from realism to abstraction. For instance, an artist working in a realistic style might use non-traditional materials to create subtle, nuanced textures that add depth to their subjects. Meanwhile, an abstract artist might employ expressive shading to evoke emotions and moods through bold, gestural marks.
When experimenting with non-traditional materials, keep the following tips in mind: choose materials that resonate with your subject matter, such as using rough-textured charcoal for a landscape piece; explore unconventional tools like sponges, rags, or even household items to add novel textures and effects; and don’t be afraid to take risks – expressive shading is all about embracing uncertainty and allowing the material to guide your creative process.
Mastering Different Shading Styles and Techniques
Now that you have a solid grasp of basic shading techniques, it’s time to expand your skills and master various styles, from subtle gradients to dramatic contrast. This section will explore the key elements of several popular shading methods.
Realistic Shading vs. Expressive Shading: Understanding Your Style
When it comes to shading, you may find yourself drawn to one of two primary styles: realistic or expressive. Realistic shading aims to accurately depict the way light interacts with an object’s surface, often resulting in a highly detailed and lifelike representation. This style typically employs techniques like gradual transitions between colors and subtle shifts in value.
Expressive shading, on the other hand, prioritizes conveying emotion and mood over strict accuracy. It may involve bold color choices or dramatic contrasts to create a specific atmosphere. To determine which style suits you best, consider what type of art you’re creating and what message you want to convey. Are you working on a realistic portrait or an imaginative landscape? Do you aim to evoke a sense of serenity or energy?
Mastering each style requires practice and patience. For realistic shading, focus on observing the subtleties in your subject’s surface texture and lighting. Experiment with different brushstrokes and media to achieve nuanced transitions between colors. With expressive shading, don’t be afraid to push boundaries and try unconventional techniques – this is where you can truly let your personality shine through.
Incorporating Shading into Various Art Forms
Shading is a versatile technique that transcends traditional mediums. While it’s often associated with drawing and painting, its applications extend to digital art, graphic design, and even architecture. In fact, shading plays a crucial role in creating depth and dimension in various forms of visual media.
In digital art, shading can be achieved through the use of layers, textures, and color manipulation. Artists can use software like Adobe Photoshop or Sketchbook Pro to create complex shading effects that would be difficult to achieve with traditional mediums. For instance, adding subtle gradients or shadows to a 3D model can greatly enhance its realism.
In graphic design, shading is used to add visual interest and hierarchy to compositions. By applying gentle shading to typography or icons, designers can create visually appealing elements that draw the viewer’s attention. Architects also utilize shading to enhance the visual impact of building designs, creating an inviting atmosphere through strategic use of shadows and light. To incorporate shading into your work, experiment with different techniques, such as layer blending modes or texture overlays, to achieve unique effects.
Common Mistakes to Avoid When Working with Shading
When working with shading, one common mistake is overcompensating with darker values, which can lead to an unnatural and unbalanced look. This oversight can quickly undermine your entire piece’s depth and mood.
Over- or Under-Shading: Tips for Achieving Balance
Achieving balance is key when it comes to shading. Over-shading occurs when too much dark value is applied to a single area, creating an unnatural look. This can lead to flatness and a loss of dimensionality in the artwork. Under-shading, on the other hand, happens when not enough contrast is used between light and dark areas, resulting in a lack of depth.
To avoid over-shading, focus on subtle transitions between values. Gradually build up shading by layering thin washes or soft pencil strokes. This approach will help you achieve smooth, gradual shifts in value without creating harsh lines or abrupt transitions.
When addressing under-shading, consider the overall contrast range in your piece. Ensure that both light and dark areas have enough depth and dimensionality to create a sense of volume. Use reference images to gauge the level of detail required for your subject matter. For example, a delicate vase might require more subtle shading than a rugged landscape. By balancing values effectively, you’ll create artworks with greater visual interest and emotional impact.
Maintaining Consistency and Repetition in Shading
Consistency and repetition are essential when working with shading, as they create a sense of depth and dimensionality in your artwork. To achieve consistency, it’s crucial to maintain a consistent tone and value structure throughout the piece. This means that if you’re using chiaroscuro, for example, ensure that the areas of light and dark are balanced consistently.
A common mistake is to apply shading haphazardly, resulting in an uneven or patchy appearance. To avoid this, try creating a value study before starting your main artwork. This will help you identify areas where values may clash or need adjustment.
When it comes to repetition, focus on repeating patterns and shapes within the shading itself. For instance, if you’re shading foliage, repeat the same leaf pattern consistently throughout the piece to create a sense of continuity. Similarly, when working with textures, ensure that they are repeated in a way that creates a cohesive look. By maintaining consistency and repetition in your shading, you can elevate your artwork from good to great.
Conclusion: Mastering the Art of Shading
Mastering the art of shading requires dedication and practice. It’s not just about applying techniques, but also understanding how to balance contrast, value, and texture to create depth and dimension in your artwork. By now, you should have a solid foundation in various shading styles and techniques, from subtle hints of atmosphere to dramatic chiaroscuro. To take your skills to the next level, focus on experimenting with different media and surfaces. Try combining traditional methods like pencils and charcoal with digital tools for added flexibility. Remember that mastering shading is not about achieving perfection; it’s about conveying emotion and mood through the subtleties of light and shadow. By embracing this philosophy, you’ll be able to create artworks that captivate and inspire your audience.
Frequently Asked Questions
How Long Does It Take to Master Expressive Shading?
Mastering expressive shading requires patience and practice. With consistent effort, you can develop your unique style in several weeks to months. Focus on experimenting with different materials and techniques regularly.
Can I Use Digital Tools for Realistic Shading Too?
Yes. Many digital tools offer advanced features that can help you achieve realistic shading effects. Familiarize yourself with the software’s basic functions before attempting complex scenes or characters.
What If My Art Form Isn’t Traditionally Shaded? Should I Still Apply Shading Techniques?
Shading is a versatile technique that can be applied to various art forms, including graphic design, architecture, and even video games. Identify your unique needs and adapt shading techniques to suit your medium’s specific requirements.
How Do I Create High-Contrast Scenes Using Hatching and Cross-Hatching?
To create high-contrast scenes with hatching and cross-hatching, start by sketching the basic shapes of your subject. Gradually build up layers of varying density using different sizes of tools or digital brushes to achieve the desired contrast levels.
Is It Possible to Achieve Realistic Shading Without Mastering Hatching and Cross-Hatching?
No, while it’s possible to experiment with other techniques like stippling or atmospheric perspective, a solid understanding of hatching and cross-hatching is essential for achieving realistic shading effects in most art forms.