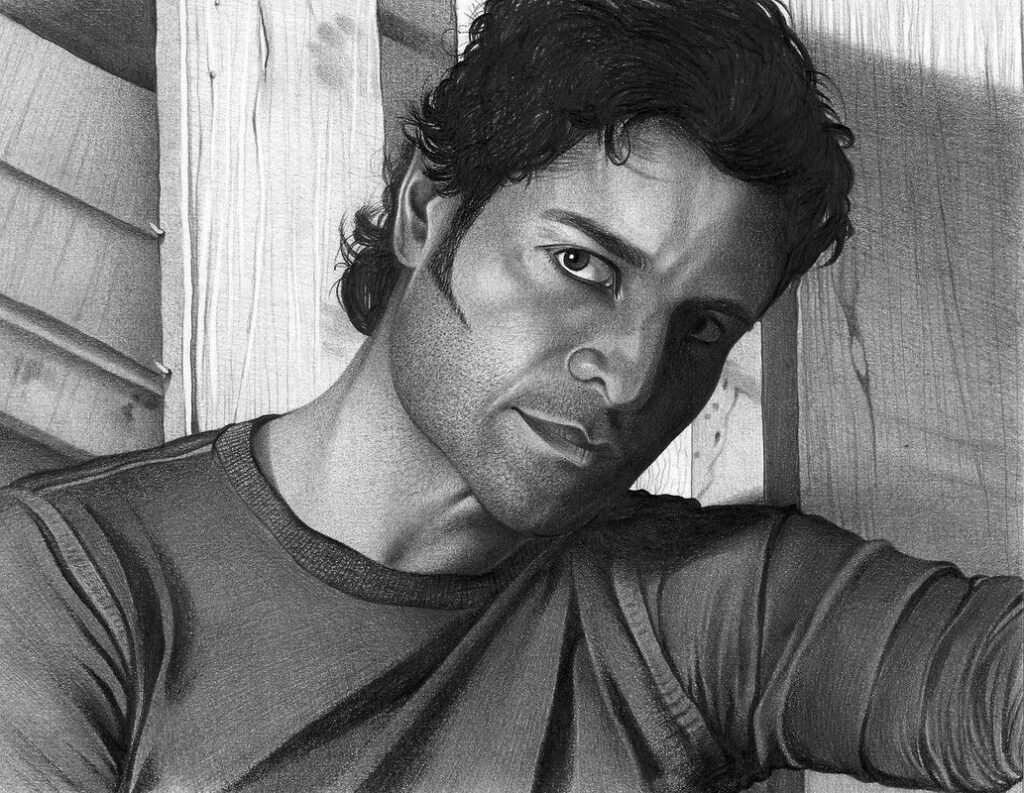
Drawing a realistic male face can be intimidating for beginners, especially when it comes to capturing its intricate anatomy. You’ve probably struggled with getting the proportions right or creating a believable expression. But don’t worry, with practice and the right guidance, you’ll be able to render a stunningly accurate male face in no time. This comprehensive guide will walk you through the essential elements of drawing a male face, including facial proportions, anatomy, and advanced techniques for capturing realism. You’ll learn how to identify key features such as the eyes, nose, mouth, and jawline, and how to balance them to create a harmonious composition. By the end of this article, you’ll have gained the skills and confidence to tackle drawing male faces with ease and precision.
Understanding Facial Proportions and Structure
To draw a believable male face, it’s essential to understand the underlying proportions and structure of facial features. The relationship between these elements is crucial for creating realistic expressions.
Understanding the Basics of Facial Proportion
When drawing a male face, it’s essential to understand the fundamental principles of facial proportion. One key concept is the division of the face into thirds, fifths, and sixths. Imagine three horizontal lines that intersect at the top of the head, the center of the forehead, and the bottom of the chin. These lines help you place facial features in proportion.
The eyes should sit along the upper third line, roughly one eye-width apart from each other. The nose is usually positioned on or below this line, while the mouth sits on or above the lower third line. When drawing a male face, note that the nose and mouth tend to be wider than those of females.
To apply these proportions specifically to the male face, remember that men typically have a more prominent jawline and a slightly wider head shape compared to women. This can affect how you place features like the eyes and nose in relation to each other. When dividing the face into fifths or sixths, consider the subtle differences in facial structure between individuals.
Remember, these proportions serve as guidelines rather than strict rules. Practice and observation will help you develop a better sense of facial proportion and adjust your drawings accordingly.
Analyzing Facial Features and Expressions
When analyzing facial features and expressions, it’s essential to break down each element into its individual components. Start by examining the eyes: are they wide open or narrowed? Are the eyelids smooth or creased? Consider the shape of the eyebrows – are they straight, curved, or angled? These details contribute to a person’s overall expression.
Next, look at the nose and mouth. Is the nose straight or slightly curved? Are the lips thin or full? Is the mouth relaxed or pressed together? Notice how these features interact with each other – for example, a raised eyebrow can create tension in an otherwise calm face.
Pay attention to the jawline as well: is it sharp and defined or softer and more rounded? Observe how different facial expressions affect this area. A clenched jaw, for instance, will alter the shape of the lower face.
To capture various expressions on paper, try sketching the same face with distinct emotions. Practice rendering a calm face, then one that’s smiling or laughing. Notice how these variations require subtle changes in facial features and proportions. By analyzing and drawing different expressions, you’ll develop your skills in capturing subtleties of emotion on the male face.
Drawing the Basic Shapes of the Face
Start by breaking down the face into basic shapes, using simple forms to capture its overall proportions and features. These foundational elements will help guide your drawing.
The Importance of Ovals and Circles in Facial Drawing
When drawing a male face, it’s essential to start with the basic shapes that make up its structure. Ovals and circles are fundamental components of facial drawing, providing the foundation for more intricate features. The oval shape, specifically, is crucial for capturing the overall proportions of the face. It should be placed at an angle, slightly offset from a direct vertical line, to accommodate the natural contours of the male skull.
The circle is also vital, as it forms the basis of several key facial features. The eyes, in particular, are circular in shape, and their placement within the oval is critical for achieving accurate proportions. When drawing the face, start by sketching a large oval for the overall structure, followed by smaller circles for the individual features.
To emphasize the importance of ovals and circles, consider this: when you’re drawing a portrait, try to break down each feature into its simplest shape. If an area can be simplified into a circle or oval, do so – it will make your drawing more accurate and easier to refine later on. Remember, these basic shapes aren’t just starting points; they should inform the entire drawing process.
Refining the Features with Geometric Shapes
To refine facial features with geometric shapes, start by visualizing the eyes as almonds. The top of each almond should be slightly tilted to indicate the shape of the eyebrows. Draw two gentle curves above the eye sockets to create a smooth transition from the face to the forehead.
For the nose, draw a small triangle pointing downwards, making sure it’s centered between the eyes. A slight indentation at the tip of the triangle will help create the nostrils. To add depth to the mouth, draw two slightly curved lines below the nose, forming an inverted V shape. The curves should be gentle and rounded, avoiding sharp edges.
When using geometric shapes, remember that the goal is not to create rigid forms but to capture the underlying structure of the face. Use these shapes as a guide to refine your drawing, paying attention to proportions and placement. Practice drawing different facial features using various geometric shapes until you feel comfortable with their unique characteristics.
Drawing the Eyes and Eyebrows
Now that we’ve established the basic facial structure, it’s time to bring your male face to life by adding expressive eyes and perfectly shaped eyebrows. Let’s focus on crafting these essential features.
Understanding Eye Anatomy and Proportion
The eye is typically positioned about one-quarter of the way down from the top of the face and aligned with the center of the nose. In a male face, the eyes are usually set wider apart than in a female face, with an average distance of around 2-3 facial widths between them. The upper eyelid is slightly more prominent in males, while the lower eyelid is often less defined.
The shape and size of the eye itself can vary significantly from one individual to another. However, most male faces have eyes that are almond-shaped rather than round or oval. This means the outer corner of the eye is usually more pronounced than the inner corner.
In terms of proportion, the pupil should be roughly one-third of the way down from the top of the iris and about one-quarter of the way across its width. The eyebrows play a crucial role in framing the eyes and adding to their expression. Male eyebrows are often thicker and more angular than those of females, with a more defined arch.
A good rule of thumb is to place the outer corner of each eyebrow at an angle of around 10-15 degrees to the eye above it. This helps create a sense of balance and harmony in the face.
Capturing the Expression in the Eyes
The iris is often described as the window to the soul, and it’s true that a well-drawn iris can convey a wealth of emotion. To draw a convincing iris, consider the shape and color you want it to have. Typically, a male iris is more angular than rounded, with a distinctive “cat-eye” shape at the top. You can achieve this by using a sharp pencil or fine-tip pen to create a smooth curve.
The pupil, on the other hand, should be smaller and more rounded, but still clearly defined. A well-placed dot of graphite or ink can help you get the size and shape just right. Don’t forget that the eyelids play a crucial role in expressing emotion – even when they’re relaxed, they can give away subtle hints about your subject’s mood.
When drawing the eyes, pay attention to how they’re positioned on the face. For a realistic look, make sure the top of the iris is roughly level with the bottom of the eyebrow arch. This may take some experimentation, but it’s essential for creating a convincing expression.
Drawing the Nose and Mouth
Now that we’ve covered the eyes and eyebrows, let’s move on to creating a more defined facial expression by drawing a nose and mouth. This is where subtlety matters when it comes to capturing a male face.
Understanding Nose Anatomy and Proportion
The nose is a distinctive feature of the male face, playing a significant role in shaping overall facial expressions. To draw a realistic nose, it’s essential to understand its anatomy and proportions.
The nose is situated between the eyebrows and the mouth, with its base roughly at the level of the lower eyelid. Its length typically spans about one-fifth of the total face width, with the bridge forming a gentle angle around 10-15 degrees. The nostrils are usually positioned at an equal distance from the tip of the nose.
There are three main types of noses: Greek, Roman, and aquiline. A Greek nose is straight, short, and narrow, often seen in men with strong facial features. In contrast, a Roman nose is slightly longer and wider, often curved upward at the bridge. An aquiline nose, also known as a hawk’s nose, is characterized by a prominent bridge and a sharp, pointed tip.
When drawing the nose, pay attention to its placement on the face. The bridge should be centered between the eyebrows, with the nostrils aligned with the mouth. This will help you capture a natural, balanced expression.
Capturing Facial Expressions with the Mouth
When drawing a male face, the mouth is a crucial aspect of conveying emotion. The lips, chin, and jawline all play important roles in expressing a range of emotions, from subtle hints at happiness to dramatic displays of anger or sadness.
Start by paying attention to the shape and curve of the lips. A relaxed, open mouth has a soft, rounded lip line, while a tense or pursed mouth has a more defined, angular lip edge. Practice drawing different lip shapes and observe how they change the overall expression of the face.
The chin also contributes significantly to the emotional impact of the mouth. A pointed chin can give a sense of determination or aggression, while a softer, rounded chin suggests gentleness or vulnerability. Consider adding subtle contours to the jawline as well – a slight hollowing under the cheekbone can add depth and emotion to an otherwise straightforward lip line.
To capture the subtleties of expression, study the way the mouth interacts with the rest of the face. Notice how the eyebrows and eyes work together with the lips to create a cohesive emotional statement. By paying attention to these details and practicing different combinations, you’ll develop your ability to convey a range of emotions through the mouth alone.
Drawing the Jawline and Hair
Now that you have a solid foundation for the eyes, nose, and mouth, it’s time to focus on defining the strong lines of a male face. Let’s draw a sharp jawline and some stylish hair.
Understanding Jawline Anatomy and Proportion
The jawline is a defining feature of the male face, and its anatomy plays a crucial role in creating a realistic drawing. To draw a convincing jawline, it’s essential to understand its proportion and placement on the face. The ideal angle for the jawline is typically between 10-15 degrees above horizontal, sloping upwards from the chin to meet the neck. This angle helps create a strong, defined shape that contributes to a masculine appearance.
When considering facial hair, keep in mind that it can significantly impact the overall expression and shape of the jawline. A well-groomed beard or stubble can add depth and texture to the face, but excessive growth can overwhelm the features. In contrast, a clean-shaven look can accentuate the angularity of the jawline.
To achieve accurate proportions, use the following guidelines:
• Measure from the bottom of the ear to the chin: this line should be slightly longer than the distance between the bottom of the nose and the mouth.
• Draw a gentle slope upwards from the chin, keeping in mind that the angle should be consistent with the overall facial structure.
• Consider the relationship between the jawline and the neck; a smooth transition is key to creating a natural-looking drawing.
Adding Texture and Dimension with Hair and Clothing
When drawing a male face, adding texture and dimension with hair and clothing can make all the difference in creating a realistic and engaging portrait. Start by considering the type of hair the subject has – is it short and neat, or long and unruly? This will help you determine how much texture to add. For example, if the subject has a buzz cut, you can simplify the hair to just a few strokes with varying lengths.
For longer hair, consider adding layers or texture with short, curved lines. Pay attention to the direction of the hair growth – this will help create depth and dimension on the face. When it comes to clothing, keep it simple by focusing on the folds and creases in the fabric. You can use gentle curves and S-shapes to suggest the softness of a sweater or the crispness of a dress shirt.
To add even more depth, consider the way the subject’s hair interacts with their face. For example, if they have a beard or mustache, you can use short, staccato strokes to suggest the texture of the facial hair. Experiment with different styles and techniques to find what works best for your drawing.
Advanced Techniques for Drawing Realism
Now that you’ve mastered the basics of drawing a male face, it’s time to take your skills to the next level with some advanced techniques that will add depth and realism to your portraits. We’ll cover subtle nuances like eye anatomy and expression.
Capturing Light and Shadow on the Face
Capturing light and shadow on the face is crucial for creating a realistic and three-dimensional drawing. When it comes to male faces, the angularity of the features can make it difficult to achieve soft, subtle transitions between light and dark areas. To create convincing textures and shading, focus on the areas where the skin folds over the facial bones, such as the tops of the cheekbones, nose, and jawline.
Notice how the shadows deepen in these areas, creating a sense of creasing and wrinkling. Use short, hatching strokes to suggest this texture, working from light to dark to build up gradual transitions. For more dramatic effects, consider adding subtle shading to the recessed areas around the eyes, nose, and mouth.
To avoid harsh lines between light and shadow, blend your strokes slightly at the edges. This will help create a soft, natural-looking transition that captures the subtlety of human skin. By paying attention to these details and taking the time to build up gradual shading, you can create a face that looks genuinely three-dimensional and full of life.
Enhancing Facial Expressions with Gesture and Movement
When drawing a male face, facial expressions can make or break the realism of your artwork. To capture subtle nuances in expression, it’s essential to consider the role of gesture and movement in enhancing the overall look. Start by observing how different facial muscles move when expressing emotions – for example, the slight raising of the eyebrows during surprise or the downward tilt of the mouth during sadness.
Notice also how these movements affect the surrounding features: a raised eyebrow can create deep creases on the forehead, while a furrowed brow can draw in the corners of the eyes. To accurately depict these effects, pay attention to the subtle shifts in facial structure and muscle tension that occur with different emotions. Practice drawing various expressions – from subtle smiles to intense scowls – to develop your understanding of how gesture and movement contribute to the overall character of your subject.
When drawing gestures, focus on capturing the underlying movements rather than just tracing the surface features. Consider using quick gestural drawings to capture the energy and flow of different emotions, then refine these sketches into more detailed portraits. By incorporating gesture and movement into your facial expressions, you can add depth and nuance to your artwork, making it feel more alive and engaging.
Putting it All Together: Practice Exercises and Tips
Now that you’ve learned the fundamentals of drawing a male face, let’s practice what we’ve covered so far with some exercises and tips to help refine your skills.
Sample Exercises to Practice Drawing a Male Face
To practice drawing a male face, try these exercises:
- Simple Profile: Draw a series of profiles with varying facial structures. Start with basic shapes – an oval for the face and a slightly curved line for the jawline – and add details such as eyes, nose, and mouth in simple forms.
- Expressive Eyes: Practice drawing different eye expressions on separate sheets of paper. Use circles or ellipses to create the shape of the eyes, then draw curved lines for the eyelids and add pupils with a small dot or circle.
- Facial Profile Variations: Modify the basic facial profile by adjusting features such as the nose, mouth, or jawline. For example, try making the nose slightly larger or more pointed, or change the shape of the eyes.
- Male Face Variations in Different Angles: Practice drawing a male face from different angles – front view, three-quarter view, and profile view – to understand how facial features change as you move around the subject.
These exercises will help you develop your skills in drawing a male face by focusing on individual elements and experimenting with variations. Remember to practice regularly and refer back to your progress to see improvements.
Tips for Improving Your Skills and Overcoming Challenges
To overcome challenges and improve your skills when drawing a male face, start by identifying areas where you need more practice. Focus on one feature at a time, such as the eyes or nose, to develop muscle memory and increase accuracy. For example, if you struggle with capturing the shape of the eyes, try practicing simple exercises like drawing different eye shapes without any facial features.
Another strategy is to study reference images from various angles and lighting conditions. Pay attention to how the features interact with each other and how they change under different circumstances. This will help you develop a deeper understanding of facial anatomy and improve your ability to capture realistic expressions.
When working on a new piece, take regular breaks to step back and evaluate your progress. Ask yourself questions like “Is my proportions correct?” or “Am I capturing the subtlety of this expression?” By regularly assessing your work and making adjustments as needed, you’ll be able to refine your skills and produce more accurate drawings.
Additionally, consider joining a drawing community or finding an online resource with tutorials and feedback. Having support from peers can provide motivation, new insights, and opportunities for growth.
Frequently Asked Questions
How to transfer my new knowledge to drawing other people?
When learning how to draw a male face, it’s natural to wonder if the skills will translate to other faces. Yes, many of the principles and techniques learned in this guide can be applied to drawing female faces as well, but keep in mind that there are distinct differences between the two. Focus on understanding facial proportions, anatomy, and expressions, which remain consistent across both genders.
What if my drawings still look too cartoonish or amateurish?
While following the steps outlined in this guide is essential for developing your skills, practice and patience are also crucial. Yes, it’s normal to produce subpar work initially. To overcome this, try observing real-life faces, study the work of professional artists, and experiment with different mediums and techniques.
How do I know when a drawing is “good enough”?
While there’s no one-size-fits-all definition of “good” in art, you can evaluate your progress by comparing it to your initial attempts. Yes, noticeable improvements are usually an indicator that you’re on the right track. Remember, the goal is not perfection but continuous improvement.
Can I use these techniques for portrait photography or digital art?
While this guide focuses on drawing, the principles of facial anatomy and expressions can be applied to various mediums, including photography and digital art. Yes, understanding how light interacts with facial features can enhance your photography skills, while knowledge of anatomy can improve your ability to create realistic digital portraits.
How long should I practice each day/week to see noticeable improvements?
Consistency is key when developing artistic skills. While there’s no one-size-fits-all answer, aim for dedicating a set amount of time daily or weekly to practicing drawing, and gradually increase this as you become more comfortable with the techniques outlined in this guide.